Unbrick Qualcomm via QFIL: Using rawprogram0.xml, patch0.xml, MBN
- Mohammad Wasim
- Jul 1, 2022
- 4 min read
In this guide, we will show you the steps to get rid of Qualcomm using the QFIL Tool and rawprogram0.xml, patch0.xml, and MBN files. Exit custom development, and then you could flash custom ROMs, recoveries, and even access the system partition by rooting the device via Magisk. However, this is only one side of the coin. Testing these modifications carries some risks as well. In most cases, your device could end up in boot loop or soft-bricked mode.
But even in such cases, you could restore life to your device by flashing the firmware via Fastboot Commands or the Android Flash Tool. However, the real problem arises when your device becomes hard, as you could not even access the Fastboot / FastbootD functions. But thanks to the Qualcomm chipset, your Pixel device (up to the fifth row) has an underlying Emergency Download Mode. And in most cases, your device will start automatically in this mode once installed.
Thus, with your Pixel launched in Qualcomm EDL mode, you can then flash the MBN Developer files, rawprogram0.xml, and patch0.xml using the Qualcomm Flash Image Loader (QFIL) Tool, and therefore browse. However, this usually turns out to be easier said than done. This is because the official Factory Image (OTA) firmware files released by Google do not have any of these three files. So, even if they have the QFIL Tool in their hands, there is not much they can do to bring their device back to life.
So what else could be done? Well, in this guide, we will provide you with the MBN firmware file and then show you the steps to manually create the rawprogram0.xml and patch0.xml files. Next, we will upload all three of these files to the Tool and then see if it is successful or not. Well, let's start with the steps to disassemble the Qualcomm device using the QFIL Tool and the rawprogram0.xml, patch0.xml, and MBN files.
Unbrick Qualcomm via QFIL Tool, rawprogram0.xml, patch0.xml, and MBN File
The following instructions are listed in separate sections for ease of understanding. Be sure to follow the exact same order as mentioned. Droidwin and its members will not be liable in the event of a thermonuclear war, your alarm does not wake you up, or if something happens to your device (well, it is already closed, but still!) And the data by performing the following steps.
STEP 1: Install Qualcomm USB Drivers
First, install the Qualcomm USB drivers on your computer so that it can recognize the connected Pixel device in EDL mode. So see our guide to Qualcomm HS-USB QDLoader 9008 drivers.

STEP 2: Verify the EDL connection
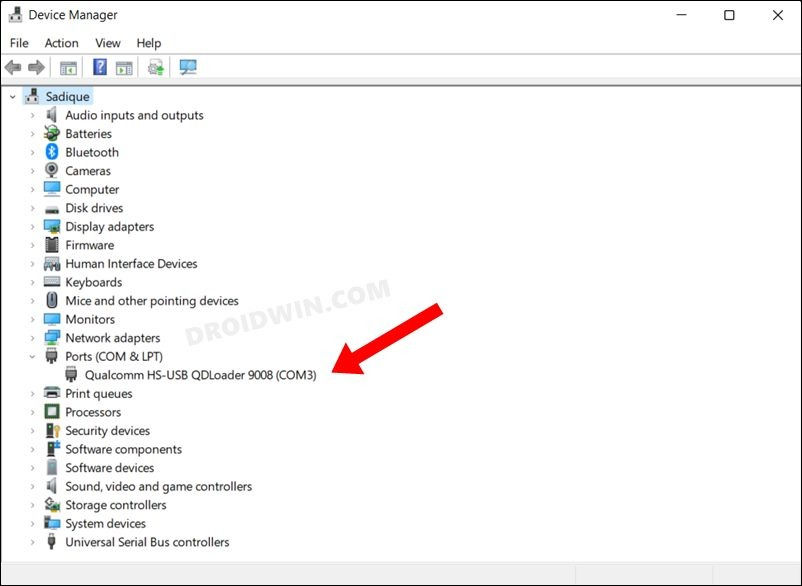
Connect your device to the computer via USB cable. Then use the Windows + X shortcut and select Device Manager from the menu that appears.
After that, expand the Ports (or Other Devices) section. If your device is referred to as Qualcomm HS-USB QDLoader 9008, then the connection is successful.
3. However, if it complies with QHUSB_BULK with a yellow exclamation mark, then verify the driver installation again, use the official USB cable, try using the USB 2.0 port, use a Windows 8 PC (if possible), and try other such modifications until the connection is successfully established.
STEP 3: Download the QFIL Tool
Your next step should be to download the Qualcomm Flash Image Loader Tool (QFIL).
After that, export it to any convenient location on your computer

This will give you some files, you need to double-click on QFIL.exe to start the tool.
STEP 4: Download the Qualcomm MBN firmware file
The MBN file contains partition images for Qualcomm devices, but as already mentioned, this file is not released by Google. Fortunately, we have been able to obtain the MBN file for the Pixel 4A [all thanks to XDA Senior Member spaceminer ] so you can download it from the link below. We will update this section with MB files for other Qualcomm devices as and when we have the same.
This is a bundle of MBN files corresponding to different domains and providers. So be sure to download the one that corresponds to your area and your mobile phone company.
STEP 5: Create Pixel rawprogram0.xml and patch0.xml files
Similar to the MBN file, Google also does not provide the rawprogram0.xml and patch0.xml files. But what many users do not know is the fact that we could create both of these files ourselves using a Python tool. So take a look at the How to create rawprogram0.xml and patch0.xml wizard.

STEP 6: Flash rawprogram0.xml, patch0.xml and MBN file via QFIL and unbrick Qualcomm
First, connect your device to the computer with a USB cable. Make sure it is started in EDL mode.
Then start the QFIL Tool and make sure the tool displays your device as a Qualcomm HS-USB QDLoader 9008 with a port number in brackets.

Now select Flat Building in the Building Type area.
Then click the Search button next to Developer Path in the Developer Select area.
Now go to the MBN file, select it and click Open. The file will now be uploaded to the tool.
After that, click the XML Upload button.
Then go to the rawprogram0.xml file and click Open.
Similarly, select the patch0.xml file and click Open. It will also be loaded into the tool.
Now that all the files have been uploaded, click the Download button and wait for the process to complete.
When you are done you will be notified about the same and your device will boot into the operating system.
This is. These are the steps to unplug your Qualcomm device using the QFIL Tool and the rawprogram0.xml, patch0.xml and MBN files. Please note that we are unable to share QFIL firmware files or even the QPST Tool for this issue. Therefore, do not ask for the same in the comments section. However, if you have any doubts about the above steps, then you can submit your questions in the comments below.

Comments